Showing posts with label green idea. Show all posts

Wednesday, December 26, 2012

Warm hands, warm hearts

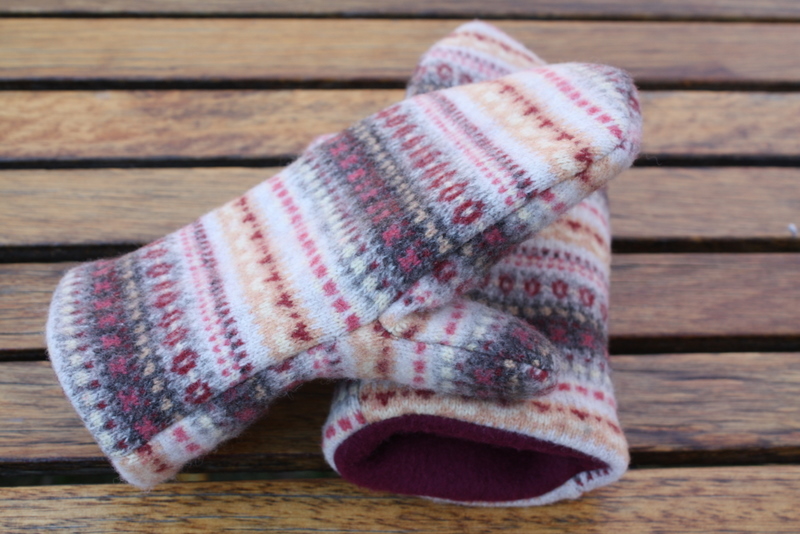
This holiday I made a(nother) batch of mittens. 


My paternal Grandmother passed away about 5 years ago, and after her passing I was able to have a few pieces of her wardrobe.  I wasn't sure what I would do with any of the clothing items.  I had taken bits and pieces to incorporate into my youngest daughters' baby quilts, but other than than I wasn't sure.  I did know, however, that in time I would figure it out.

About six weeks ago when Hurricane Sandy hit I started to go through my fleece collection.  My intent was to send materials out east to a friend that was working furiously to help with hand sewn items to keep folks warm after losing their homes.  I realized that I didn't have much of a fleece collection to speak of - and thus ordered her some fleece for her efforts - but I did find a fleece jacket that belonged to my Grandmother tucked inside the pile.  And I started on a project to keep some hands warm closer to home.


The jacket was enough to make mitten backs and I put together my other left overs and upcycled fleeces to make the palm pieces and linings.  


In the end I made 7 pairs of mittens - a pair for each of my Aunts, and one pair for my Mom.  She took the leftover scraps and made holiday ornaments for each of my Uncles' families.

I wrapped up each pair of mittens with a note about the origin of the fleece, and a hope that the mittens would warm both their hearts and hands on a winters' night.

May your own holiday season be filled with love and warmth, memory and hope.

Tuesday, April 10, 2012

A Craigslist-tacular Spring Break

new-to-me yarn swift

It was spring break around here last week.  We were busy going here-and-there, visiting family and friends, making holiday decorations, and enjoying eachothers' company. For a few days, the older girls attended a visual arts mini-camp, and the younger set was tasked with helping me do deep spring cleaning. 

In a marathon of craigs-listing baby items (yes, our family is now complete) I realized that I could/should take a moment and craft a 'wanted' post for something I've been hoping to purchase for some time: a yarn swift. 

And wouldn't you believe it! The craigslist faeries were watching out for me.  In less than 24 hours from my post, a woman e-mailed me with one for sale.  A large Glimakra umbrella swift, that to her eye had hardly been used (she was selling it for a friend).  Well just my luck.  The seller even delivered.

The rest of that afternoon was spent taking turns pulling yarn from the swift and winding it into balls.  It sure is a step up from me sitting solo on the couch unwinding skeins by hand.  I've still got an active want ad for a ball winder.  We'll see if one turns up in the near future.  Until then I've got three willing helpers, and one delightful babe full of yarn mischief to wind with.

- - - - - - - - - - - - - -

Next week I'll be guest blogging over at a happy stitch.  Melissa is hosting a series on sewing/crafting spaces and I'll share my thoughts on the 'essentials' for making crafting happen while herding a family of six.  Come on over for a tour.


Thursday, December 22, 2011

Dispatch from the workshop, Part 1 (Sewing)

Matchy-matchy mittens

Did I say something about matching mother-daughter mittens awhile back?  Well that thought, originally written in jest, wouldn't leave me alone.  I had dreams about them.  So I dove in head first and made four pair.  One for me, and one for each of my older girls. The baby is still too little to get a pair of mittens, but I have extra materials to make her a pair in a couple years.  And my husband, as the father to four girls, can certainly appreciate a rainbow, but passed on having a pair of rainbow mittens for himself.  Understandable.

The fabric for these is entirely upcycled clothing - a striped, cotton sweater for the mitten back, turquoise polar fleece for the palm, and black polar fleece for the lining.  Two fabrics came from sweaters at the thrift store, and the third from my closet (no, not the sweater thankfully - I could never pull something that bold off!)  They are not windproof, or waterproof, so will only work for winter car trips and early fall weather, but damn they turned out cute.

They came together in two days - cutting on one day and sewing/assembly on the other.  Easy peasy.  I plan to slip these under the tree for the girls to find Christmas morning.

As the title notes, this is the first of a few posts that I will dedicate to highlighting the ways we (my husband and I) made this a special handmade holiday for our family and friends.  Stay tuned - there's woodworking, knitting, drawing and sewing coming your way!

Now, where did I put those mitten clips?

Friday, November 18, 2011

Upcycled Mittens


check. this. out.


Last weekend my Mom took a fantastic mitten making class with the extremely talented and witty Mary Jo, from Five Green Acres.  She showed me her mittens-in-progress and I decided on the spot that I needed a pair of my own.

I have actually been coveting the pair that Mary Jo uses in her tutorial photo.  And over the past year I have casually shopped our thrift stores for a sweater that would make a similar pair.  About two months ago I spied a teeny-tiny 100% wool sweater in the children's section.  It used to be a women's medium, before someone accidentally ran it through the washing machine.  For 30 seconds I felt bad about buying something that a child could use to keep warm, but I know that my own kids protest at wearing felted wool, saying it is too stiff and scratchy.  With this in mind I snatched up that sweater, brought it home, (eventually) cut it up and paired it with some polar fleece from my stash = new mittens for me for this winter.

The sweater provided precious little yardage, so maybe I can make one more pair of adult-sized mittens.  Or definitely a kids pair for one of my littles.  Is it time for mother-daughter matchiness?  Maybe.  Or maybe I should head back to the thrift store in search of sweaters big enough to make matching pairs for the whole family!!  Yes!!  That's the ticket. 

The pattern and tutorial are straightforward and easy to follow, even for a beginning sewist.  The only tricky part is sewing the lining to the outer mitten, and like Mary Jo says, just take your time.  Seriously, once you have the materials on-hand (haha) it only takes 1 or 2 evenings of actual cutting and sewing to make a whole pile of mittens.  You also don't need to have felted wool to make these mittens - Mary Jo provides ideas for many different kinds of materials to use for making warm, soft, winter mittens.


What to make your own pair(s)?

Go Here!


Also if you are in the Madison, WI area check out Mary Jo's other classes too! 

Friday, November 11, 2011

Daisy Banner (Girl Scouts)

Daisy Troop Banner (2011) - Detail


My older girls joined a Daisy Troop (the precursor to Brownies and Girl Scouts) last year in Kindergarten.  The troop needed a banner - to carry in parades, and at their ceremonies - and I knew that I could help out it doing that.  And while this project isn't something I would normally blog about, when I began searching for ideas for this project I couldn't find ANYTHING in the main blogosphere to get me started; get me inspired.

In the end this banner actually took a lot of planning - I started with a list of 'elements' that I knew I needed to include, but I had little else to go on.  The elements list, in no particular order:

: Include Troop number
: Lightweight - it is for 6 yo's to carry after all
: Represent each girl AND the troop as a whole
: Incorporate daisy theme
: Inexpensive
: Quick to make
: Maximize child participation in creative process
: Maintain illusion element of parental control (so it would get done!)
: Easy and enjoyable b/c they will need a new one next year for Brownies

Process notes: I sewed the main background (sun, field, troop number and blue sky) and then brought that with me to a meeting with the girls.  I prepared daisy 'kits' for each girl and walked them through the tracing and cutting of each flower, it's petals and stem.  Then we assembled (I have a new found LOVE for the hot glue gun!) each daisy and each girl got to 'plant' hers in the field.  I went through and affixed each one in place and took the top home to assemble the back and sew it all together.  I approached this part like a quilt, without the batting.  I sewed right sides together, turned it, and top stitched all around.

Materials notes:  The blue background was fashioned from an upcycled twin bed sheet.  And the extra bonus is the top portion of the sheet doubles as the sleeve for the dowel to carry the banner!  I purchased the green felt for the 'field' and used cheap felt sheets for each of the flowers and the sun.  I found a stylized daisy to trace on the internet.  The field and sun are self-designed.  The backing is the bottom half of the same bed sheet.  I also added a back panel with each of the girls' names.  I had them sign a spare piece of background fabric using colorful sharpie pens.  I don't like that they bled so much, but hey, the names are still legible.

Name panel


So here I present to you, the Daisy Banner for Troop 2980 from Madison, WI.  It's a bit slouchy given I don't have the dowel purchased yet.  It turned out wider than it was in my mind and we don't happen to have a 6.5 foot dowel laying around the house.

Daisy Troop Banner (2011)


As I said before, this isn't the kind of project that I would normally blog about, but I hope that in doing so I can provide inspiration for other crafty parents that unwittingly find themselves in front of 12 Daisy troops jumping (literally) to be part of the creative process.

Growing up I wasn't a girl scout (both my Mom and her Mom were girl scouts, however)...so this is all new territory for me.  I have to admit I love the cookies!

Wednesday, May 18, 2011

Re-Cap: kcwc


In my last moments of kcwc I managed to squeak out this skirt. I picked it up at a clothing swap (free!) knowing full well it didn't fit me, but it held promise as a skirt that could be re-fitted for the younger set. I cut out the zipper from the back, resewed it together, and then shortened the skirt by 4 inches from the top. With an elastic casing waistband the project came together rather quickly on Saturday morning.

I had grand hopes of making a skirt from this pattern, but it will have to wait for another day (solid pink and peace fabric). Here are my leftovers, staring at me longingly after a good week of sewing. They will get their day to shine soon. Not sure what will become of the blue floral - maybe outdoor dining napkins for the summer?


I gained back a bit of sewing mojo this past week. I look forward to keeping it up, and the fact I got Scandinavian Stitches at the library yesterday will help! I am going to take some time to plan out a few special projects for the fall challenge, I think that I am ready for something a bit more complicated (oliver + s, Leila & Ben, and Carefree Clothes for Girls are some possibilities...) The challenge also added a new filter to my brain for when I go to the thrift store/garage sales - if something is too small for me, could it be re-fitted for my girls?

Friday, May 13, 2011

Mid-week report: kcwc


As we approached the middle of the week I accomplished two more items for my younger girls. First up is a pair of baby leggings. They are really the simplest of projects; I'm embarrassed that I didn't make other pairs for my older girls when they were itty-bitty. It will be a few months before the baby is big enough for these, but they should be perfect for covering her delicate knees in the fall and following spring.

I've seen project tutorials for these around the blogosphere for awhile, but I didn't rely on any particular one for these. My directions were: Take a pair of unused thrifted women's knee high socks, cut the feet off, and hem the bottom edges. Done and done.


The second project is a pair of cropped pants for my 3.5 yo. I tried making something like this earlier in the week with some scrap cotton that I had in my stash. I failed miserably. First I took a pair of jersey cotton pants that fit her tush perfectly and did what many others have done: traced, cut and sew. But they did not turn out at all. They were too small (narrow) and had no give at all. So I decided to put those pants, unfinished, aside and instead sought out advice from an expert.

Heather Ross came to my rescue. I pulled my copy of Weekend Sewing off the shelf and found the pattern for the Huck Finn pants. I followed the pattern for the 2T, but added an extra 3.5 inches to the length of the pants. And what do you know? They fit her!

The material is from an upcycled linen skirt that I had set aside, and to punch them up (c'mon, what little girl is excited about brown pants?) I added a faux knee patch featuring her favorite character: Scooby Doo. We don't normally go for commercial characters or name brands, but Scooby just makes her, so...well, happy. Thankfully she l-o-v-e-s these pants. And they look darn cute on her too.

Last on the sewing list for this week are two skirts. One twirly, one upcycled.

Monday, February 28, 2011

Baby Sweater


I am really excited to knit for this new baby. The trouble is that s/he will be born in the next few weeks. Not the ideal season to begin wrapping a newborn in woolens - spring is right around the corner, no? And since we don't know if the babe is a 'he' or a 'she', I am shying away from knitting anything bigger, knowing there will be time to knit fall/winter items later in the summer.

However, a nice set of coincidences headed my way over the last week and I was able to knit up this little newborn-ish size sweater out of a lovely un-dyed organic cotton. Kristen Kapur - the famous knitwear desinger from Through the Loops - was having a blog-based de-stash sale and I was able to purchase some lovely skeins of organic cotton by Blue Sky Alpacas at a deep discount. I love this yarn! It knit up very quickly and is super soft. I also love that it is undyed and organic - perfect for a little baby sweater.

I found the buttons on a special trip to the yarn store with one of my older girls - she loves dogs (look here for one of her dog-themed holiday gifts) and my LYS has a life-sized stuffed animal dalmation in the store that she can snuggle up with while I browse. Arn't these buttons just the greatest? I was hoping to find something unique, like little fish, but a little fish in a fishbowl with air bubbles? Oh my. That exceeded every hope I had!

So this may be the end of the baby knitting for a little while, and truth be told I should really get on making a light sweater for my youngest daughter. As she transitions into 'big sister' she is going to need some extra attention and snuggles. She is very independent, and at 3 yo she is a full year older than her sisters were when she arrived in our family. I am so grateful for the independence, but she is also old enough to sense the change that is happening; and young enough still to cling to being the baby when she feels she is not getting what she needs. I think a little tunic like this (the last sweater in the post) would be cute - and I'll let her pick out the yarn color(s) as an added treat.


Wednesday, January 20, 2010

Reusable food wrappers and pouches


I've been wanting to make sandwich wraps and re-usable snack baggies for our family for awhile. But I was totally intimidated when I started to read about them on-line and all the cautions about food safe plastic. Over the long new year's weekend I threw caution to the wind and with the help of this tutorial and this one I came up with the set you see above. So far I have three sandwich wraps and six snack bags. Each wrap has a coordinating baggie, and then there are three random ones to take with us when we run errands or go to the park, etc.

The lining for these is made from the un-used remnants of an old Ikea shower curtain (I believe it's made from PEVA and from what I've read this is a good alternative to vinyl or PVC). I did try to use the liners from cereal boxes - a suggestion I read about somewhere - but they ripped terribly and didn't hold up; not the way I need them to for me to use them on a consistent basis. Which is sort of the point, right? I mean why make a reusable sandwich wrapper that isn't durable enough to be re-used?

These were all made from my fabric stash - I didn't need to purchase anything to make them, with the exception of velcro. So, Rule Number One for the 2010 Stash Challenge - small accessory purchases like velcro, thread, buttons (me) or screws, sandpaper and drill bits (him) will be allowed, but must be discussed and approved first. We are also allowed to make purchases with any gifts we receive during the year.

And Rule Number Two quickly became apparent when after an afternoon in the sewing room I emerged with this set, and after an afternoon in the workshop he succeeded in cutting a few pieces of wood. Rule Number Two is that projects will be celebrated based on ingenuity, quality, creativity, and usefulness - not the quantity of projects we can make.


Monday, January 18, 2010

Holiday Gift Monday: Star doll


When I asked the twins what they wanted to give to their sister for Christmas they both said, in unison, a doll. I had seen the pattern for this gem in a recent issue of Living Craft and was itching to try it out. After seeing a very talented friend make one for her son (in a single evening no less) I knew I wanted to make one too.

I personally thought the directions for the doll were sketchy. The dimensions provided would have made a doll much to small for me to work with and there was no clear presentation of how to assemble the final doll. But I winged it and came up with this cutie. I wish I would have made a larger doll from the start. If I ever make another one I will be sure to use 8 inch squares or larger. I also only used the sewing machine on three pieces so it could easily be converted to a hand-sewing-only project. I also left off the face details. I like that this instead brings the focus of the doll to the star.

I used an upcycled shirt from the local thrift store for the body and hat. The fabric is a velour - very soft which my youngest loves right now - and the star design is something that was already on the original shirt. The head is made from a scrap of an old t-shirt.

It's too soon to tell if this little doll will make it to the top of her favorite stuffies list (current slots are filled by a bunny, a dog, a lamb and a momma cow/baby cow combo), but it sure looks great on the toy shelf in her room.

Monday, November 2, 2009

Wag the Dog (or Happy Halloween)

This years Halloween costumes were sewn in a two-day event. One day to buy the fabric and cut the pieces, and one day for assembly. I relied on the help of this pattern, but adapted it to my own kids' tastes. The suits are made of polar fleece, which was perfect for our 40 degree weather.

They asked to be dogs for Halloween. Specifically, they wanted to be their favorite stuffed dogs. One is all black, and the other brown and white.

I've made costumes for the twins every year since they were born. My youngest daughter uses their old costumes, or thrifted ones that are part of the general dress-up collection in our casa.

I enjoy sewing (bags, quilts, pillows, etc.) but I don't entirely enjoy garment making. For me, kids costumes fall somewhere in the middle. So, having a interest in sewing puts me well on the road of making our own costumes. However, I also feel an overwhelming desire to make their costumes. I want my kids to remember the creative energy - as zany as it is - that surrounds dressing up for the land of make believe. But, there is more to it than that for me. For my kids they are just costumes, right?

Yet, I'm not sure what this 'more' is. Is it because my Mom sewed costumes for me and my brother when we were young? Is there tradition buried in the piles of thread and fabric scraps? Or is it something more global? Or more personal? Something that ties in to values I hold about art and craft and society? Values I hold about mother/parenthood?

In a way, I feel that making costumes is a personal statement about our culture and our choices. By making costumes - and knowing that they will be worn over and over and over again, and not just on Halloween - I choose to reject the idea that we live in a disposable society. The amount of waste produced by our family alone (a family that tries its best to recycle, reuse and repurpose as much as possible) is staggering. Often times I need to get rid of half of what I bring home from a store just to use an item: the packaging and the bag(s) it came in. So I find small ways to push back against this reality. I make or thrift cloth napkins. We make school lunches with re-usable containers. We buy in bulk. We use our own shopping sacks.

I was forced to think this issue through when a friend of a friend said, "I bet you're the kind of mom that makes your kids Halloween costumes, right?" It was a kind remark. It was intended to celebrate and support my creativity and motherhood. However, I was discomforted by the remark and I didn't figure out why until later. Making my kids costumes is less a sign of love for my kids than it is a statement about how we consume/use in our society - especially around holidays. Lots and lots of parents purchase costumes (handmade and otherwise) for their kids on Halloween and they don't love their kids any less than I do mine.

While I was taking this photo of my girls I was reminded of the saying - popularized by the movie of the same name - Wag the Dog.

To 'wag the dog' means to purposely divert attention from what would otherwise be of greater importance, to something else of lesser significance. By doing so, the lesser-significant event is catapulted into the limelight, drowning proper attention to what was originally the more important issue. The expression
comes from the saying that 'a dog is smarter than its tail', but if the tail were smarter, then the tail would 'wag the dog'. [From useenglish.com]
So, I'm starting to wonder if this is it. Maybe I am wagging the dog with this costume issue. I want to draw attention to the sustainable handmade/homemade movement and away from the costume. For me the 'more' seems to be my desire for a society that values the art of independent creating, and not cheap plastic.

Saturday, August 8, 2009

Re-useable gift bag

I know I have a pattern for making something like this somewhere. The bags I'm thinking of might actually be in Weekend Sewing - are they weekend or travel bags? - but I've loaned that book out to a crafty friend and don't have it near by. So I just made it up as I went along. This, mind you, came with it's own challenges.

I wanted something simple, easy-to-sew (i.e., minimal seams and shaping) and I even drafted pattern notes to make sure I was on the right path.

I started with two panels, hemmed them around three sides and made casings at the top for drawstrings. Sounds good so far, right? Yet, when I assembled the pieces I got it wrong, backwards and wonky. Oh well, when life gives you lemons, you make lemonade, or apple-pear juice as the fabric would suggest, right?

So I stitched the whole thing together from the outside (wrong sides together) - three times to give it a semi-purposeful quilted edge look. And, unfortunately the drawstrings don't actually draw anything closed. They just run thru the fabric on each side of the bag so you have to push the fabric around until it closes. So much for my (sewing) pattern drafting skills, but I'm still a beginner so I'll cut myself some slack here.

It's a small bag so it works. The print is cute so it works. I'm happy with my apple-pear juice - it's delicious.

And the contents of the bag you might wonder? Three gorgeous dish towels from Orange Tree Imports for my SIL's birthday.