Showing posts with label tutorial. Show all posts

Sunday, February 16, 2020

From the toe up


One of my New Years resolutions was to learn how to knit a sock from the toe up (with a bonus of learning how to knit a sock using two circular needles). I'm proud to report that I have tackled this project and also learned Judy's magic cast-on.

This book has been a huge help, and I am following the ribbed ribbon lace pattern for this first pair. The yarn is "The Upside Down" by Leading Men Fiber Arts - I love that I am learning how to knit this pair of socks "upside down!"


I have been playing around with different circular needle lengths too - I found 9-inch to be too short, 16-inch to be comfortable, but a bit unwieldy, and 12-inch to be about perfect. I am enjoying these 12-inch driftwood needles by Lykke for the time being.

Monday, December 30, 2019

Christmas Socks (for me!)


During that same trip to the craft store, I was inspired to knit up a pair of holiday socks for myself. I did the striping with two different yarns and worked on making jogless stripes. I also learned how to make clean stripes while knitting rib stitches. Pretty cool!


With the exception of mis-matched toes (one is two rows longer than the other), I think they turned out really well. I'm not sure how that happened (probably just not paying attention) but once they are nice and worn in, it won't even matter.


Saturday, February 16, 2019

Darning Mushroom


Never used one of these before, but a hole in the bottom my my husbands sock meant I had to try. I think it went pretty well - I opted for the woven technique since the edges were pretty frayed. The repair has been holding up nicely and doesn't seem to bother him too much - success!


Saturday, April 4, 2015

Guest Projects (from Grandma)


One of my daughters is learning to sew.  She loves all aspects of sewing - picking out fabric, learning the stitches, choosing patterns, the notions, all. of. it.

My Mom has been helping her along with special 'sewing days with Grandma'.  For Christmas my Mom gave her this fantastic tutorial and a box of filler.  A couple days into the new year she had her very own bean bag chair!

As you can imagine, the other three girls begged for one too.  I took the girls to the fabric store to choose and purchase fabric and each beanbag turned out so unique and different.  All four were sewn by my Mom and daughter.  The fourth beanbag (not properly photographed) is the red/light green one in the background of the third photo.


here's that bird fabric again!


The other project my Mom recently finished up are polar fleece front-pocket pullovers for each Granddaughter.  They are warm, snugly and an all-time favorite for each girl.  Thanks Mom for your hard work, creativity and generosity!


Wednesday, March 11, 2015

Zippers: Open Wide Pouch


For more practice with zippers I moved on next to the Open Wide Zipper Pouch tutorial.  This one has a liner and a different design from the boxy tote - this one stands upright and when open is fully open so you can see the entire inside.

This first one is made mostly from fabric I picked up on a recent trip I took to Japan to visit with friends.  Fabric shopping in Japan is similar enough to the US that I was able to request fabric off the bolt by the meter without a problem.  I brought home quite a bit, but it's never enough, right?  At least the prices were comparable to what I find here in the US so I don't have any regrets there - but the selection in the stores, oh my!  It was a treat.  

This first bag is already at home with my Sister-in-Law.


This design offers a full lining which was the next thing I was looking for in my search for zippered pouches.  I love this design so much - and was getting such great practice with my zipper foot - that I ultimately made six of these bags. 

Four are the large size and two are mini ones that I made with my nieces during a recent overnight stay with us.  I also cut up a pair of old jeans for the bottom of the exterior.  I think it lends a nice contrast and some durability to the final pouch.


I still need lots of practice with zippers but I feel more confident now about how to work with them.  My next attempt will be for a boxy tote with a full lining.

Tuesday, February 17, 2015

Zippers: Toiletry Bag


One thing that I still haven't mastered is placing zippers.  It's something that I have been wanting to tinker around with but I didn't have any zippers around to practice with.  After searching the web for a few tutorials for zippered pouches I found some ideas, went to the store to stock up on zippers of different lengths/colors and set to work with my scrap pile.


I really love this first boxy toiletry bag.  The tutorial is from Skip to my Lou.  It is roomy and a great size to store all kids of things.  And while I added a handle to one end to improve the functionality I don't care for the exposed interior seams/raw edges (if I would have made it with oil cloth/laminated cotton, like the tutorial recommends, then this would have been less of an issue for me).


I am not sure what will become of this one.  It might just hang around the house for a bit.  I'm sure one of my daughters will take to it soon enough.

Friday, October 3, 2014

Pattern Test: The Messenger Bag


I am one lucky girl.  This past month I was able to test sew a pattern for my friend Melissa Q. from a happy stitch.   I am not an accomplished sewer - very much still a beginner - but I am keen on adding new skills and giving this messenger bag a test run was a great experience. 


Overall it took under 4.5 hours to cut, prepare, assemble and sew the bag - not bad for something so incredibly functional, unique and awesome.  My favorite feature - aside from the slender, compact size and customized strap length - are the inside pockets.  Perfect for a phone, lip gloss, pens and your headphones.


As a beginning sewer I was a bit nervous about how it all might come together, but following Melissa's photos and clear directions made it very easy to pull off.  She provides lots of helpful hints along the way.

It is quite a professional looking bag and I have gotten lots of compliments on it already.  The lining looks wonderful and fits well.  The bag is also reinforced with interfacing, giving it the right amount of body and structure without any additional bulk.


The biggest compliment of all is that one of my older daughters (9yo) desperately wants to have this. "Mom, messenger bags are WAY cooler than backpacks," she says.  I have to agree with her on that.  Especially when it is this messenger bag we're talking about!


The pattern for this bag should be available in Melissa's Etsy store starting today.  Go pick up the pattern, find some fantastic fabric and sew yourself one.  You won't be sorry you did.

Monday, June 2, 2014

FO: Pixel Portrait - Family


Over Memorial Day weekend I went from idea to finished portrait.  Relying heavily on Martha Stewart's tutorial and clip art I came up with a rendition of our family on graph paper.  Check here for details. 


After sketching the first draft I went back and cut and taped edits all over.  Graph paper is awesome to work with for that very reason!

The final product shifted a bit still - no chickens, I changed up some of the accessories, and I still have to add our family name.


I was able to use many different colors, but tried to use the same color at least twice in the portrait to keep a sense of unity.  I also threaded a gold strand in the twins' hair to make it a bit different from Dad.  

I can't believe how darn cute this turned out...and check Etsy and Google Images for tons of other great ideas for how to customize it even more.  
Friday, November 18, 2011

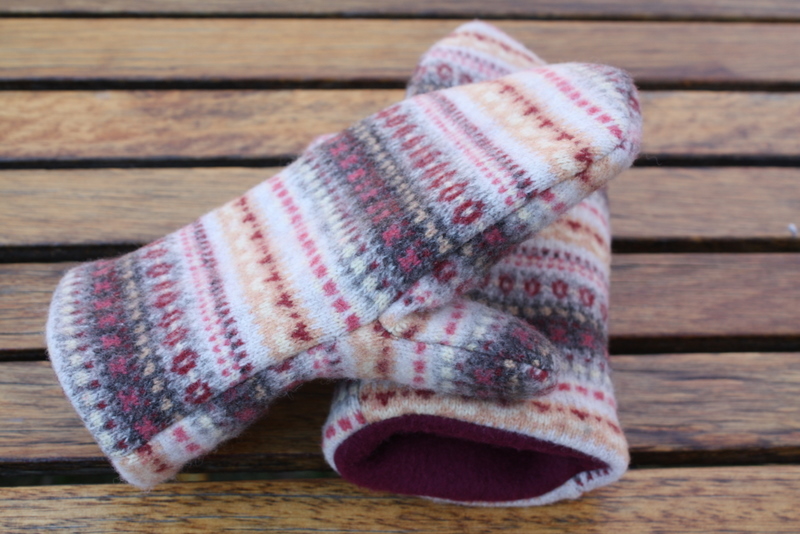
Upcycled Mittens


check. this. out.


Last weekend my Mom took a fantastic mitten making class with the extremely talented and witty Mary Jo, from Five Green Acres.  She showed me her mittens-in-progress and I decided on the spot that I needed a pair of my own.

I have actually been coveting the pair that Mary Jo uses in her tutorial photo.  And over the past year I have casually shopped our thrift stores for a sweater that would make a similar pair.  About two months ago I spied a teeny-tiny 100% wool sweater in the children's section.  It used to be a women's medium, before someone accidentally ran it through the washing machine.  For 30 seconds I felt bad about buying something that a child could use to keep warm, but I know that my own kids protest at wearing felted wool, saying it is too stiff and scratchy.  With this in mind I snatched up that sweater, brought it home, (eventually) cut it up and paired it with some polar fleece from my stash = new mittens for me for this winter.

The sweater provided precious little yardage, so maybe I can make one more pair of adult-sized mittens.  Or definitely a kids pair for one of my littles.  Is it time for mother-daughter matchiness?  Maybe.  Or maybe I should head back to the thrift store in search of sweaters big enough to make matching pairs for the whole family!!  Yes!!  That's the ticket. 

The pattern and tutorial are straightforward and easy to follow, even for a beginning sewist.  The only tricky part is sewing the lining to the outer mitten, and like Mary Jo says, just take your time.  Seriously, once you have the materials on-hand (haha) it only takes 1 or 2 evenings of actual cutting and sewing to make a whole pile of mittens.  You also don't need to have felted wool to make these mittens - Mary Jo provides ideas for many different kinds of materials to use for making warm, soft, winter mittens.


What to make your own pair(s)?

Go Here!


Also if you are in the Madison, WI area check out Mary Jo's other classes too! 

Thursday, August 27, 2009

Zipper pouch

I have had a long standing fear of zippers. I was never sure how to exactly sew them, or size them. Could I just pick any size zipper? What is an invisible zipper? How did I get the zipper ends to match up to my project exactly?

Last weekend all three of our girls were at my parents for the night (a first for us!) and I had some time in the sewing room while DH had time in his workshop. Armed with cute fabric and a seven inch zipper I dove in head first. I tackled my first zipper and it was scary, but good.

I'm really happy with the tutorial I chose. It was well written, clear and seemed to be free from what I consider "unnecessary" or "fussy" steps (pinning, basting, etc.). Yes, I know that these are very important, and probably underrated, facets of the sewing art, but with a limited amount of time - and a steep learning curve - I was going for rapidity and results, not quality, my first time around.

I say the experience was scary because I did wind up sewing over the zipper teeth. As the tutorial pointed out I was careful to avoid the metal parts of the zipper, but my needle still made a scary sound as it passed over (thru?) the zipper teeth and I saw the needle bend dangerously. I've had a few close calls with breaking needles while sewing with my machine. I've even considered wearing safety glasses after a sharp needle point flew at my face after breaking. Next time I put in a zipper I'll think twice about the glasses, and probably wear them. Anyone have advice on this? Was I doing the correct thing by just going right over the zipper teeth? Is there a way to make this a more enjoyable experience for my machine next time? Anyone else have problems with flying metal when their needles break?

I followed the tutorial as best I could and am amazed that I wound up with this cute little pouch. It's sized perfectly for my knitting dpn's and has found a cozy home in my knitting basket. I've already got my eye on three other zipper projects! The next time I'd like to find something that turns out nice crisp top corners or has a rounded look overall.

Skip To My Lou also has a great tutorial on cloth napkins - I've fabric laundered and ready to go for that project too.


Tuesday, June 9, 2009

Weekend sewing

Over the weekend the girls and I found ourselves with a 50-degree, rainy day and Dad gone for work. What were we to do? The girls declared it a sewing day, and I happily obliged. It wasn't weekend sewing with Heather Ross (that book is arriving later this week!), but it was weekend sewing to be sure.

Last time I sewed with the girls I had each one sit in my lap and work the fabric into the machine. This time, I showed them how to use the foot pedal - with their hands.


Olivia has sometimes complained of her back hurting while we drive in the car (but at no other time?!?), so she asked that we make a car pillow for her back. Abby wanted one too. They picked out the fabric themselves, and I cut it. I started the stitching, but they completed it. I got out the poly-fil, but they stuffed the pillows themselves (all the while claiming that tutus, princess slippers and swim goggles were the required wardrobe for the project). I sewed them closed, but they will be the ones to use and love them.

To distinguish the pillows from one another - since they picked out identical fabrics - we used their first inital on the back of the pillows. I cut out the first letter of their names from an extra iron-on patch I had lying around.


Once the girls had their pillows I knew I'd have an extra 20 minutes while they immediately played with them. I got to work on a small, quick project that I've been wanting to try for some time - a coffee sleeve. Thanks to Erin of House on Hill Road for making the project so quick and so easy to pull together. You can find her tutorial here.

Monday, March 9, 2009

Totally, and completely, justified

Well, that's what I told myself since I've been spending so much time in front of the computer lately. I had my 50% coupon for JoAnn's to get some of this, so essentially for $2 I got myself a new mouse pad. Dan had lots of cork underlayment left over from a remodeling job at our old home - sometimes being a pack rat really pays off! I already had this amazing fabric in my stash. Thanks (again) to Sew, Mama, Sew! for the great tutorial.

If I were to make another one I'd probably use an exacto knife, or something more sharp, to cut the cork. I just used regular scissors and while it worked, the edges are bit jagged for my taste. The project also only took me about 15 minutes from start to finish - gotta love that!

Thursday, March 5, 2009

My quilts on Sew, Mama, Sew!

Here they are! I was contacted a couple days ago about using photos of my doll quilts for an upcoming post on the Doll Quilt Sew-Along. I was so excited to be asked. The awesome tutorial was put together by Alissa. I highly recommend giving a doll quilt a try - even if you don't consider yourself a sewer. I am more of a knitter than a sewer myself; and if I can do it with squirmy three year-olds on my lap anyone can do it.

I also have to highlight my other favorite Sew, Mama, Sew! project - the Classic Tote (and related tutorial) by Irene. I've made a zillion of them and each one has been put to good use. You can see most of the ones I've made here and here.

Hello to all you visitors from Sew, Mama, Sew! Leave comment below and say "hiya" if you feel like it. And for those of you that came here looking for sewing stuff - maybe not knitting stuff - here's a link to the doll quilt post and my other sewing adventures.

By the way, I'm currently flattening some cork board under heavy books in hopes of making one or two of these this weekend. Fat Quarter Month rocked, don't you think?

Saturday, February 14, 2009

Bird in Hand

Happy Valentine's Day! Let me present some red mittens in honor of this day of love.

I first spied these mittens on the hands of a fellow knitter here in town. Do you see the bird?(Photo credit: Kate Gilbert, 2007) I was instantly in love and quickly added them to my ravelry queue. Last weekend I decided to give them a try as I have now frogged my forest mittens, again. Third time is a charm, right?

These are knitting up like a dream. I even learned a two new techniques from this pattern: picot edging and braids. Let me just say that picot edging is so cute and easy! You'll be seeing more of it in the future from me.

I also had a light bulb moment and finally figured out how to wrap - or carry - the yarn while doing two color knitting. I had been trying to do it a bunch of different ways with no success. Then I realized that I really just needed to twist the yarns around each other - not actually knit the color I was carrying - to make it work. Viola.

The picture below is actually of the second mitten I made. I knit up the first one on size 3 needles and they came out way too big. They would have fit a giant. I ripped it apart and dropped down to a size 1 needle. Now it fits me perfectly. I also added the gold color as an accent. Adding that third yarn sparingly was a good choice on my part. Going from two yarns to three yarns is difficult. More difficult than, I dare say, going from two kids to three :)
The mittens are pictured with some cool mitten blockers handmade by maudawoodworks. I showed him this DIY tutorial (these sisters have lovely blog too) then traced my hand for him. A short time later he presented me with a pair of these. Besides being lovely, who can resist a detachable thumb?!

I still have the thumb of the right mitten to finish, but I have already cast on for the left mitten. I'm pretty excited to finish these off and use them. Even though the weather has been at record-breaking temps (50 degrees!) lately I know more cold weather is on it's way.


In reflecting on my other pair of mittens, I've decided to re-work them with the same yarn/needles I'm knitting these up with. The patterns don't match up exactly, but they sure are close. So, with some help from a lovely friend a solution has been proposed. Modify the pattern (slightly). Unfortunately this does mean monkeying a bit with the tree design, but really not too much. I like to think of it as sustainable forestry of sorts.

Friday, January 23, 2009

Shout out to the cowl

It has been slow going getting back into the knitting thing with my semester going, so instead I have decided to take some time to talk about a few projects that I had going for the holidays. First up is the cowl. I have rave about this project! For beginning knitters this is a great first project when learning how to use circular needles, or double-pointed needles. It is sort of like a really big hat, without worrying about making a point at the top - you are basically knitting a long tube. I've provided some basic directions below, along with a list of reasons why I just love, love, love this project.

The one pictured here was made for my SIL for Christmas. It is knit up with Misti International 100% Alpaca, hand dyed worsted weight yarn. Details are on ravelry.

Here's the basic formula:

1) Cast on 100 stitches, more or less depending on gauge and how big you want the final diameter to be**.

2) Knit in stockinette for 5 rounds.

3) Purl one round.

4) Continue in stockinette for 9 inches, more or less depending on how 'scrunchy' or 'drapey' you want the cowl to be.

5) Purl one round more.

6) Continue in stockinette for another 5 rounds.

7) Bind off all stitches and weave in yarn ends.

How to I love thee cowl? Let me count the ways...

1) The yarn - you are free to pick anything that feels good against your skin. You can pick something bulky if you are looking for warmth, or something lace weight of you want something pretty.

2) The ease - you can practically knit this in your sleep if you like. It is stockinette all the way (with two purl rows). Or, if you are up for a challenge, you can plan something more complex. There are some gorgeous patterns out there like this, or this. Or you can design your own with practically any pattern from a book.

3) The color - the combinations are endless. You can go with a self-striping or variegated pattern. You can go with a solid to show off a stitch pattern. You could make one in every color of the rainbow.

4) The quickness - these knit up fast too. The two that I've made have took less than 4 hours each. Of course, the more intricate you get, the more time they take, but they are well worth the effort.

5) The "wow" factor - you can wear them around and I guarantee that people will comment on them. You can casually drop in that you made it yourself, or you can be shy about it and just say "thanks." Whatever you prefer, I guarantee it will be noticed.

6) The low cost - this can easily be a one skein project. Perfect for showcasing some stash yarns or it can be an excuse for picking up that one skein you can't live without.

7) One word of caution - many yarns can stretch over time and won't necessarily return to their original shape with a hand washing. Keep this in mind when picking yarn, and be sure to knit up a quick swatch!

** You can take your gauge swatch and your tape measure and determine the perfect fit for you. Just multiply your gauge by the number of inches you want the cowl to be in circumference. Or, take your tape measure and lay it around your neck to determine the circumference you'd like. Then multiply by your gauge and you have the right number of stitches to cast on. For example, if you want the cowl to be 20 inches in circumference and your gauge is 5 sts per inch, cast on 5 x 20 = 100 sts.