Saturday, December 31, 2011

Dispatch from the Workshop, Part 5 (Hand Sewing)

Dragon Gloves, 2011

And our Dispatch(es) from the Workshop(s) series comes to a close with a final hand sewing project. 

I have been encouraging the girls to give each other gifts each year and with my help we had another successful sister-to-sister giving season (the baby didn't give anything this year).  One girl picked out dog ornaments, another picked out Scooby Doo paint-it-yourself magnet craft kits.  And my last daughter wanted to make something for her sisters.  [As an aside, each gift the girls picked out cost $1 or less - whether it was b/c the items were on clearance, or were made with materials I had at home already.] 

We have lots and lots of old issues of Family Fun Magazine floating around the house.  They are perfect to flip through on a rainy afternoon to find a new game or activity to pass the time.  And it was in the pages of that magazine that she found the idea for Dragon Gloves.  I picked up the gloves at the store, and she picked out the felt colors from my stash.  I did the making (tracing, cutting and sewing) when she was in bed one night the week before Christmas.  I had visions of us sitting down together to sew them, but with school in session right until the Friday before the holiday it didn't work out that way.  But her project did get finished and she was so proud to give the gloves to her sisters.

If you are interested in your own pair of dragon gloves (for yourself, or the kids in your life) you can find the pattern here.  It's a great project to match up, and still wear, those single gloves floating around the bottom of the mitten basket!

Thursday, December 29, 2011

Dispatch from the Workshop, Part 4 (Knitting)

Oven Mitt detail


I only knit two gifts this year - one was for my mother-in-law and the other was a commission for the son of a friend. 

For my mother-in-law I worked up an oven mitt, using the free pattern, Out of the Frying Pan, by Susan Anderson.  The bright blue worsted weight wool yarn made a fantastically dense fabric that was still surprisingly easy to embroider.  You can see the amazing shrinking properties of wool in the before-and-after-felting photos below.  I did use our front-loading washing machine to felt this mitt, but neglected to check on it at 5 or 10 minute intervals.  This mitt probably went about 5 minutes too long, but luckily it still fits well enough for a serviceable oven mitt. 

Oven Mitt, pre-felting

Oven Mitt, post-felting

And that embroidery?  Probably shouldn't have done it free-hand while bleary-eyed.  It most certainly came out crooked.  But when you hang the mitt from the loop it straightens out (smile).  DH was kind and said that it has that 'handmade' look, but 'not in a bad way'.  Ha.


I actually like this oven mitt so much that I am working on one for myself, using a bright, minty green.  It doesn't actually match, well anything, in the house, but the color makes me happy in the cartoonish-winterfresh-mint-green sort of way.

This next project I am particularly happy about.  A friend e-mailed me the pattern mid-December, asking if I would be able to make it for her third son by Christmas.  I said of course!  The pattern, circa 1940, comes from a collection of knit items from the V&A Museum I was lucky enough to get lost in that museum two years ago and knitting this toy brought back lots of pleasant memories. 


The pattern itself isn't difficult - there are 8 pieces (2 sides, an underbelly, 2 ears, 2 pieces of mane and the tail), and each is knit up in a straight forward fashion and then assembled for the final doll.  But, the pattern does require an intense amount of attention as there are new stitch counts for practically each row, and there are lots of rows that aren't accounted for (you are just supposed to know to knit those rows!)


Knitting the mane required learning a new stitch - the loop stitch - which was pretty cool.  I definitely see some future costume potential with a 'wig' made entirely of this stitch and some novelty yarn (fur, sparkly, etc.)


You can knit yourself your own lion if you like - there is even a companion tiger to go with it!

Tuesday, December 27, 2011

Dispatch from the Workshop, Part 3 (Woodworking)


This year my husband set out to make our girls some special boxes.  The twins each asked for a necklace from Santa, so we reasoned they would need each want a special place to keep their new treasures.  These two boxes are made of walnut, and the top is birdseye maple.  They close with simple hinges and are lined with red wool felt. 


Our middle daughter is not yet old enough for a necklace, or jewelry box, but is old enough to want what her older sisters have.  So he set out to make her a 'treasures' box.  The box is constructed of birch, stained to look like walnut, and opens and closes by sliding or rotating the top.  It is likewise lined with red felt.


And the baby got a new set of blocks.  Unlike the classic building blocks of years past, these are natural tree blocks, made from a single birch tree that was cleared from our family's land west of town.  The tree was sliced into sections and sanded.  There is also a protective coat of food-safe varnish. These are extra special building blocks - the emotional connection to the wood itself is enough to make me tear up.  They look amazing with all the natural detail of the bark intact and so far all the girls have had fun trying to recreate the tree, matching up the sections and building it high up into the air. 

Sunday, December 25, 2011

Happy Holidays!

Christmas, 2011

Saturday, December 24, 2011

Dispatch from the Workshop, Part 2 (Kids crafts)

kid-made ornaments


I can't remember where I saw this idea on-line, but I know that I got it from a fellow blogger this holiday season.  With the help of some colorful fabric markers the girls and I came up with some simple, kid-friendly, and kid-made, ornaments. 

I drafted some basic shapes on the chalkboard for them (fir tree, stick reindeer, snowman and Santa hat) and they used them as inspiration for their own drawings.  My middle daughter decided to go her own route with one of the ornaments and drew a picture of 'vacation.'  I think she misses the warm weather!

Each of the girls made three drawings on one piece of fabric, and signed their work on a second.  I matched them up, sewed around being sure to place a ribbon loop for hanging, and lightly stuffed them with poly-fill.  After trimming the excess fabric they looked great!

We are definitely keeping a set for our tree, but the others are destined for family. 


Thursday, December 22, 2011

Dispatch from the workshop, Part 1 (Sewing)

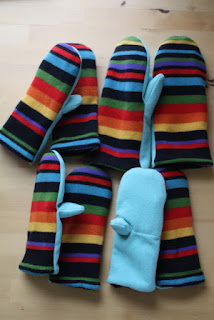
Matchy-matchy mittens

Did I say something about matching mother-daughter mittens awhile back?  Well that thought, originally written in jest, wouldn't leave me alone.  I had dreams about them.  So I dove in head first and made four pair.  One for me, and one for each of my older girls. The baby is still too little to get a pair of mittens, but I have extra materials to make her a pair in a couple years.  And my husband, as the father to four girls, can certainly appreciate a rainbow, but passed on having a pair of rainbow mittens for himself.  Understandable.

The fabric for these is entirely upcycled clothing - a striped, cotton sweater for the mitten back, turquoise polar fleece for the palm, and black polar fleece for the lining.  Two fabrics came from sweaters at the thrift store, and the third from my closet (no, not the sweater thankfully - I could never pull something that bold off!)  They are not windproof, or waterproof, so will only work for winter car trips and early fall weather, but damn they turned out cute.

They came together in two days - cutting on one day and sewing/assembly on the other.  Easy peasy.  I plan to slip these under the tree for the girls to find Christmas morning.

As the title notes, this is the first of a few posts that I will dedicate to highlighting the ways we (my husband and I) made this a special handmade holiday for our family and friends.  Stay tuned - there's woodworking, knitting, drawing and sewing coming your way!

Now, where did I put those mitten clips?

Sunday, December 18, 2011

FO: Rainbow Hat (free pattern!)

Rainbow Hat - inspired by the Noro Hat and the Swirl Hat


My daughter wanted a rainbow hat that was similar to my Noro hat, but with a regular (“not pointy”) top.  She also wanted something in bright, vibrant rainbow colors and the only yarn I found at my LYS was fingering weight.  With the help of two free patterns I came up with this sweet little hat.  Perfect for a spunky girl on the go!

If you want a copy of my pattern notes look to the side bar.  I also put the pattern on ravelry. 

Happy Holidays - may they be cheerful and bright! 


Thursday, December 15, 2011

FO: Baby Things

I had a niece arrive in the world a week ago today.  And I knew I had to make her something.  I started with this holiday vest - but it turned out too big - more of a 6-12 mos. size - so that won't work.  But it is cute for the holidays and made with a great, washable wool.  I'm not sure where this will ultimately wind up; into the gift pile it goes.


And upon looking through my knitting basket for inspiration I spied a bit of Manos I had left over from a hat I made myself a couple years ago.


And it was just the right amount to make my new niece a hat.  This is another version of the Hospital Hat.  And even though it is 100% wool (Wool Classico) it isn't scratchy in the least.

I am off to finish the rest of the half-done items in my basket.  Is it bad luck to leave strings hanging into the new year?  If so I had better get cranking.  I've a scarf, socks, mittens, hat, another pair of socks, two oven mitts, and a toy lion in the works.  Looks like I have a really good year-end, round-up-the-knitting post coming!

Thursday, December 8, 2011

FO: Norwegian Baby Cap

sweet baby cap


I finished up this sweet little Norwegian Baby Cap last week.  I intended it for my youngest, but it looks that she will outgrow this size in the near future.  So another hat will need to be knit, and hopefully before the holidays come and go.  This fourth little one of mine - not forgotten - but sometimes overlooked.  The l-o-u-d voices, demands, wants and needs of her older sisters drown out her very, very rare cries.  But her smile lights up the family.  And she is finding her place among and within us - a calm presence indeed.  She needs a little something this holiday season I think and a new knit hat will do just fine.

top view


tie detail


I knit up this same pattern a bit over a year ago, but just got around to making the i-cord ties, so here is a photo of that hat as well.  I stopped the every-other-row decreases early on this one, making a more rounded head rather than pointy.  I'm sure this one is destined for a very special little boy or girl.

sweet baby cap - v1.0

Monday, December 5, 2011

Make Do and Mend Collective: to market, to market...


Make Do and Mend Collective
Photo by Ellencreates.com


Three local friends and I recently formed an art/craft collective.  We are the Make Do and Mend Collective (more to come about this adventure in the months ahead!) and we had our first sale this past weekend at a local elementary school.  Ten percent of our profits went to support the Parent-Teacher Organization and we were among local craftspeople of all ages.  There were even quite a few students selling their art and craft projects.

I am particularly excited about this new adventure for me.  I've never sold any of my knitting or sewing before and being part of this collective has removed one of the biggest hurdles for me: inventory. 

Knitting takes a lot of time.  A. lot. of. time.  Some of us can move more quickly than others - I'm not a particularly fast knitter - but its all relative (It may take one person 40 hours to knit a sweater, but another person 45 hours).  So I have always been bogged down by the notion that I needed inventory to start selling items.  And the fact that I now belong to a group, whose work is along side mine in a display, means that I am able to offer single items.  I don't have to worry about having two or more of each item in a variety of sizes. 

For the first market I hand knit eleven raglan sleeve ornaments.  I also designed and sewed 39 re-usable, reversible coffee sleeves and seven sets of reverse applique felt coasters.  And I set out some choice knit items that I had in my collection that had never made it on to my kids, nor were given as gifts.  And I can add to this inventory over time, at my own pace, with items that I enjoy knitting and that might even sell.  I am a knitter - more than a sewist - and will focus mostly on creating knit pieces for the collective.  But you may also find the occasional color pencil roll, coffee sleeve, super-hero cape, or tote bag from me.  That's the beauty of the collective.

market wares


In reference to my earlier post about knitting items to sell, I still know that I am not a retail knitter.  I won't ever be able to crank out multiple hats, or sweaters.  But I can make unique, one-of-a-kind items and accept custom commissions.  I also know that I won't make back what the items are "worth" in terms of hours spent knitting.  But I will be able to make enough to cover the cost of my yarns, and entrance fees for shows, and maybe a bit extra to support other local artists.  And I will be putting beautiful, hand knit items out into the world, and some pieces that will be passed from one household, one family, one generation, to another.  I love that thought.

I haven't received notice of which items sold at our first market - but I did sell a hat and an ornament while I was briefly at the show.  What a rush that was! 

So, I head into new waters, buoyed by the strength of  friends that enjoy a good swim now and again.  And I hope that in return they feel my enthusiasm and happiness coming back at them, one wave (or slowly made stitch) at a time.

hand knit sweater ornaments