Wednesday, March 27, 2013

Spring Break: Enrobed Wrap + V Junkie


It is the middle of spring break for our kids and it feels nothing like spring around here.  The snow is still densely on the ground, ice is packed over grass, and the temperatures are more suited to hot cocoa and fires in the fireplace than trips around the block on a bike.  We are also having our house insulated this week (at almost 100 years old we felt it was time to bring in additional reinforcements).  

All this means that I am tricking myself into thinking that I will still need a sweater yet this season and thus working quite diligently to complete the Enrobed Wrap (a side-tie wrap sweater) by Amy Herzog.  After trying on a lot of sweaters at her workshop, I fell in love with her other wrap sweater pattern - the Striper Cardigan - but thought I would stretch my wings on a sweater that was a bit more straightforward first.  There's no color work on this one, and it is knitting up at a larger gauge.  I figure I can get things worked out on this one and move onto the next one with more confidence.

I am really pleased with how this wrap is turning out so far.  I am trusting my measurements and modifications and so far it seems to be working quite well.  The back and front left panel are complete and when I hold them up to myself they fit nicely, not too wide or too long.  The increases and decreases are in the right places; the seams match up.

This method of piecing a sweater - knitting it in separate pieces and sewing it together at the end - is new to me and I am learning quite a bit as I go along.  I will give more detail when I write about the finished sweater.  So far, they mostly have to do with selvage and edging. (I haven't gotten to seaming yet!)


My other spring break project is V Junkie by Alice Yu (in Socktopus).  I had started with another of her patterns - they are all quite stunning with variegated yarns - but got frustrated after I had trouble following the pattern. So I abandoned it for another with a honeycomb design.  It looks pretty cool so far and is a much easier stitch pattern to follow.

The colors I have on the needles at the moment are reminiscent of dyed Easter eggs - maybe spring really is just around the corner.

Friday, March 22, 2013

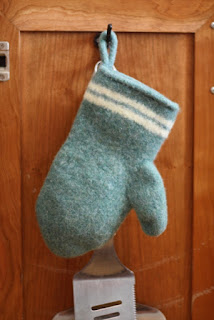
FO: Kamchatka Sea Oven Mitt

 
Here's the gift for the friend.  A spunky oven mitt, knit up and felted using the left over Peace Fleece and some Wisconsin-grown, undyed wool yarn from a friend-of-a-friend.
 
The pattern is a freebie by Amy E. Anderson, Out of the Frying Pan.  I've used it quite a few times now and think it is great.  Each wool yarn has it's own felting properties (thickness, timing) and this one was no different.  I needed to trim all the stray wool hairs on this one, lest they catch on fire!  (Probably best not to use this one over an open flame). 
 
I wrapped this up with some homemade granola, and a hope that it adequately expressed my appreciation for her help.

Monday, March 18, 2013

Girl Scout Banner

 
After the girls graduated from daisies to brownies they needed a new banner for their troop.  I was happy to help with the process again and took my time sourcing a few special touches for this banner.
 
First, since I realized that the girls graduate every-other-year to a new level, I knew that I wanted a banner that could be with them for quite a few years.  As lovely as they are to make, they do require planning, time and resources, so if we can squeeze 4-5 years from this one I would be very happy.  The idea with this banner was to make one that wouldn't be dated in a year or two - something that could grow with the troop.
 
Secondly, I knew that I wanted something meaningful for the girls.  They are getting older now, and coming to appreciate and understand what it means to be part of a larger organization (like the Girl Scouts) and that it has ties to larger ideals and values beyond immediate friendship and play time.  To that end, I reached out to a neighbor that helped me create some custom fabric for our troop.  The words we used for the design came from the Girl Scout Pledge: honest, fair, friendly, helpful, considerate, caring, courageous, strong, responsible, respect, conserve, and sister.
 
Third, I again wanted to get the girls involved in the making.  The girls' participation (cutting and planting the daisies) in the first banner was a big hit and I'm all for getting crafty with kids.  It took some time to puzzle the best way to do this with the design idea I had (and I still had troubles, mostly owing to my own lack of planning) but everyone was able to participate and make a unique (albeit secret) contribution.
 
The design idea for the banner came from one of my familes' most cherished items: our birthday banner.  I made it just after my third daughter was born and it comes out for every birthday we celebrate (both young and old).  I really like the look of pennants - they can be festive, orderly, fun and when carried on a banner give a surprising amount of dimension and life to the design.
 
The background fabric was custom designed by my neighbor Emily of Bluestar Ink.  She has amazing skills.  When we first met I asked her to help me with the technical aspects of this project: finding fonts to create a .jpg file that I could upload, and scaling them to fit.  She took it to a whole other level and hand drew each word with custom fonts - they even personify the meanings of the words (which is not lost on the girls - they noticed how strong the word strong was right away!).  She then digitized each word, scaled each one to fit in a random pattern, confirmed the pantone color with me, and then sent me the file for uploading to Spoonflower for printing.  I ordered two yards and was thrilled with the quality of the final fabric.


The fabrics I chose for the front of the flags were off-the-rack fat quarters from JoAnn Fabrics.  Sometimes you just really luck out there (especially with the 50% off coupons!).  The backing is from an up-cycled queen size sheet.  Like the banner before this one, the top hem worked perfectly as the hanging pocket.  The dark brown for the backing and letters, and bright green for the pennant strips, are my nod to the traditional colors representing the girl scouts over the years.


I used stiff felt for the letters and cut them out free hand.  In hind sight I would like to have re-done those, but time got the better of me there.  That floating "R" will bug me every time I look at it!

 
For the personalized contribution from the girls I had originally thought of embroidery.  I envisioned each of the girls taking thread and needle and sewing their initials.  But then I got real and switched gears to glittery puffy glue.  While I am really happy with that choice (it was way more fun to execute) I didn't anticipate a few things: 1) The way dried glue would stick to my machine, 2) The girls' LOVE of the glitter glue, and 3) the drying time.
 
I wound up just sewing the tips of the flags together as many girls went all the way to the edges of the pennants with their glue and there was no way my machine could handle sewing through that.  I also had to run many of the points through the machine with parchment paper to ensure a smooth sewing surface.  Lastly, while the glue bottles stated a 4-hour dry time, that surely applies to conditions of normal use.  Many of our girls used the glue like frosting and piled it on (which I LOVE about each of them) but it meant that the three days I had set-aside for sewing the banner were dedicated to glue-drying time.

 
And what makes their contributions 'secret'?  Well, you can't see them unless you approach the banner and flip the individuals pennants up.  Each girls art is there, it's just behind the surface that you immediately see.
 
In the end - and with the help of a lot of fray check - I finished the banner with about an hour to spare before the annual St. Patrick's Day parade.  [The final blow was the realization that I made a banner suited for a 7.5 ft. tall person - because I didn't want to waste a bit of that precious two yards of fabric - so I had to cut it down to size for kids.  A hasty hemming job fixed that pretty quickly.] 
 
But it all came together.  I think it is a fun representation of our troop and vibrant reminder of how so many different parts (glue, fabric, design) can come together with a harmonious end.


Monday, March 11, 2013

Knit to Flatter

This past weekend I found myself surrounded by amazing wool sweaters, supportive women and an expert on how to make hand knit sweaters both fit and flatter every body shape.

we tried on A LOT of sweaters

 My LYS hosted Amy Herzog for her four hour Knit to Flatter workshop.  It was fantastic.

Because I don't pay much attention to fashion or commercial clothing design there are some fundamentals about dressing that have always eluded me.  I have a good sense of what colors look good on me, but cut and style?  That is a whole other ball game.  And the few hand knit sweaters that I have made, while lovely, haven't left me exactly excited about knitting more.  And this class taught me why.

First, I have leaned heavily towards raglan sleeve sweaters which, based on the method of increasing stitches, presumes your body is the same shape on the front that it is on the back.  Well, I haven't been that shape since before puberty!  And while they are arguably easier to knit up, they don't fit as well unless they are heavily modified to suit your shape.  And that is incredibly difficult to accomplish well when you knit your sweaters all in one piece.  If you deconstruct your sweater into parts you can focus your modifications where they are needed/necessary.  This allows you to make a custom knit, without too much pre-planning.  And the tailored look is always in...if your clothes fit they will almost always look good.  If they don't, well, then they won't.

Secondly, I have never understood the concept of ease in a knitting - I vaguely understood it to mean that negative ease would give you a tighter garment and positive ease a roomier one - but this class showed me exactly how to work with ease to match your measurements to a garments schematic, thus greatly increasing your chances of making a sweater that looks suited to you (vs. a sweater you are trying to fit into).

Lastly, during this class we took digital photos of our bodies, drew our outline and took a few measurements  - now I have a solid understanding of shape.  I am relatively proportional, but straight (as opposed to curvy).  It is not how I envisioned myself as I walked into the classroom, but upon leaving a light bulb had gone off and I realized why certain sleeve lengths and necklines look good on me while others most certainly don't.  Fantastic.  And I would almost call it magic, except Amy is wicked smart with the numbers and has obviously spent a tremendous amount of time and energy analyzing these issues.

my homework


Amy's book, Knit to Flatter, is full of patterns that will suit any body shape made in amazing yarns.  Each sweater features directions for how to customize for your particular body, including flattering shaping lines.  You can also access all her wisdom on her blog.

I have already ordered yarn (Shelter by Jared Flood!) to knit up a new sweater for myself.  My goal for this sweater is to spend a lot of time focused on shape and fit; to knit a relatively plain/simple sweater, but one that looks smashing on me and my body.  Armed with Amy's expertise I have more than half a chance at success!  Wish me luck.