Friday, January 29, 2010

FO: TTL Mystery Sock KAL '09


I finished these lovely socks early one morning last week. They were supposed to be done last year; they were part of the '09 Mystery Sock Knitalong (blogged here), hosted by Through the Loops. But life and the holidays got in the way. In the end they turned out great in two ways, and not so great in one other.

I ran out of the yarn while knitting these and had to bring in a third skein. The colors match perfectly [great!]. But they were different yarns. The two skeins I started with - purchased on sale last year - were six-ply. I knew this would mean a pretty thick sock, but hey, they were on sale.

The third skein I found from a seller on ravelry was a 4-ply, which I didn't realize until I received it in the mail. It is more like a standard sock yarn, and it's definitely thinner than the two skeins I started with. So the socks are thick up to the toes and then thin out [not so great]. Not sure how this will wear, but I think it will be fine. And really it's the kind of thing that only a knitter would notice.

The yarn, obviously, shows off the stitch pattern really well [great!]. It is so clear, and beautiful. There is no missing the artistry and genius in the pattern for this pair of socks. If you want to knit your own pair you can find the pattern here.

Only nine more months to go until the next Mystery Sock Knitalong [great!].


Monday, January 25, 2010

Holiday Project Monday: Down comforters


Ok, not really a gift in the wrap-it-up-and-put-it-under-the-tree sense, but a necessary project for the holidays at our home. With the expected large number of overnight guests I began to gather up lots of bed linens (flannel sheets, blankets, etc.). We keep our home at a cool temperature and I wanted to make sure that everyone would be comfortable during the night. My local thrift store yielded an impressive number of linen finds, including three complete sets of brand name flannel sheets. In the end I came up with enough linens for all the overnight guests and their beds, but I wasn't having any luck with really warm, really nice twin-sized blankets.

A friend of mine - the same friend of the star doll fame - planted a brilliant idea the last time I was as her house. She told a story of sewing and cutting a large down comforter into smaller pieces for her kids. So the week before Christmas, and after some quick internet research on down comforter quality indicators, I ordered a king size down comforter from Overstock.com. I decided this was a double purchase: I wasn't just buying one down comforter, I was actually buying two.

When the box arrived I was giddy with excitement. I immediately set out to laying the blanket, measuring, and sewing two seams down the middle. Unluckily the middle of this comforter was in between two existing seams so I was in for more feather causalities than I planned. Once the seams were sewn I grabbed by scissors and began cutting. Then the feathers really started to fly. I quickly realized that this wasn't a feather storm I could contain by picking out the stragglers from beneath my seams; this called for some innovation.

Let me be the first to tell you that bias tape traps stray feathers beautifully. As I cut the blanket apart I immediately sewed on the bias tape and stopped a majority of the feathers before they emerged. The bias tape I had on hand was purple. C'mon, I couldn't of picked out a more perfect color for my girls if I tried! The sewing job isn't the neatest, but my grand plan includes finding more thrifted sheets, or two from Ikea, to make custom duvet covers.

The final dimensions of the comforters are 52 inches wide by 84 inches long, so they are a bit on the slender side, but they drape nicely over the sides of the beds. I highly recommend this project to anyone that is interested in down comforters for kids. While my heart and soul want to get them the best, warmest comforters money can buy, I will be a happier momma knowing that if accidents befall these twin lovelies - and they will - I won't be upset about it in the least.

Saturday, January 23, 2010

She wanted her own.


My youngest loves coloring, especially when her big sisters are around and doing it too. Recently there was a squabble over the colored pencil rolls and I knew it was time to make a third. I'm really happy with how this one turned out; my sewing and assembly skills are improving little by little.

The basic pattern is from LMPQG, but I made a roll that only has 12 pockets. I used a linen fabric from the stash for the exterior, fabric scraps for the interior, and an old flannel receiving blanket for the batting. The ribbon is also from the stash, and while it's not my first color choice, I was determined to use up what I have rather than run to the store to buy something new.


The pencils pictured are from Melissa & Doug. They are awesome. They are big, sturdy and shaped like triangles (to minimize rolling off table tops!) I highly recommend spending the extra couple dollars to a nice set, rather than the cheap ones on sale. I can't believe it's taken me this long to learn this lesson: it helps everyone when I get the nicer art supplies for the kids. Less frustration on their part, and fewer trips to the store to purchase replacement supplies on my part. While I spent a bit more on these sets I know that they will last for quite some time.

I made this roll earlier this month, but I would like to add it to the idea book challenge hosted by Rebekah. I own the book and pulled it off the shelf when it was time to make this little project.

Wednesday, January 20, 2010

Reusable food wrappers and pouches


I've been wanting to make sandwich wraps and re-usable snack baggies for our family for awhile. But I was totally intimidated when I started to read about them on-line and all the cautions about food safe plastic. Over the long new year's weekend I threw caution to the wind and with the help of this tutorial and this one I came up with the set you see above. So far I have three sandwich wraps and six snack bags. Each wrap has a coordinating baggie, and then there are three random ones to take with us when we run errands or go to the park, etc.

The lining for these is made from the un-used remnants of an old Ikea shower curtain (I believe it's made from PEVA and from what I've read this is a good alternative to vinyl or PVC). I did try to use the liners from cereal boxes - a suggestion I read about somewhere - but they ripped terribly and didn't hold up; not the way I need them to for me to use them on a consistent basis. Which is sort of the point, right? I mean why make a reusable sandwich wrapper that isn't durable enough to be re-used?

These were all made from my fabric stash - I didn't need to purchase anything to make them, with the exception of velcro. So, Rule Number One for the 2010 Stash Challenge - small accessory purchases like velcro, thread, buttons (me) or screws, sandpaper and drill bits (him) will be allowed, but must be discussed and approved first. We are also allowed to make purchases with any gifts we receive during the year.

And Rule Number Two quickly became apparent when after an afternoon in the sewing room I emerged with this set, and after an afternoon in the workshop he succeeded in cutting a few pieces of wood. Rule Number Two is that projects will be celebrated based on ingenuity, quality, creativity, and usefulness - not the quantity of projects we can make.


Monday, January 18, 2010

Holiday Gift Monday: Star doll


When I asked the twins what they wanted to give to their sister for Christmas they both said, in unison, a doll. I had seen the pattern for this gem in a recent issue of Living Craft and was itching to try it out. After seeing a very talented friend make one for her son (in a single evening no less) I knew I wanted to make one too.

I personally thought the directions for the doll were sketchy. The dimensions provided would have made a doll much to small for me to work with and there was no clear presentation of how to assemble the final doll. But I winged it and came up with this cutie. I wish I would have made a larger doll from the start. If I ever make another one I will be sure to use 8 inch squares or larger. I also only used the sewing machine on three pieces so it could easily be converted to a hand-sewing-only project. I also left off the face details. I like that this instead brings the focus of the doll to the star.

I used an upcycled shirt from the local thrift store for the body and hat. The fabric is a velour - very soft which my youngest loves right now - and the star design is something that was already on the original shirt. The head is made from a scrap of an old t-shirt.

It's too soon to tell if this little doll will make it to the top of her favorite stuffies list (current slots are filled by a bunny, a dog, a lamb and a momma cow/baby cow combo), but it sure looks great on the toy shelf in her room.

Friday, January 15, 2010

Newborn Earflap Hat


A neighbor of mine is having her sixth child (wow!). While I'm sure she has enough clothes for this newest little person I couldn't resist knitting up this cute little hat. As the mother of three I know that while there are clothes that cycle through all our kids there are certain items that are special to each one. Maybe it's the cut of the shirt that suits them, maybe it's the fabric or the print. Then there are those things that are crafted especially for each of us by others. I'm hopeful that's what this gift can be. A little something that was made just for this new little person.

There's a baby boom going on in my world (at least four more are on their way) so I have a few cutie-cute gift knits up my sleeve for this year. But, since there aren't any newborns in our home, Curious George will have to serve as a model. His proportions are frighteningly spot-on.

The pattern is a generous freebie from Hey Julie. I knit it up in two days. I added the seed stitch details after seeing a photo of one like it on her blog. This hat is so darn cute, and so versatile for customizing to every child and baby. I made it with about 3/4ths of a skein of a washable wool/cotton blend yarn, details are on my ravelry page. And the color? Well, perfect for either a boy or a girl I think.

The yarn for this project is a new acquisition and was purchased this calendar year. But it was purchased with gift money from Christmas, money that was given to me explicitly so I could buy yarn. So while this hat is not technically a stash project, it's a zero-impact-on-the-family-budget project. In any event, I am counting this towards one of my 2010 stash challenge projects: the five baby gifts I plan to make this year.


Thursday, January 14, 2010

Knitters Without Borders


I donated today. My first time. Like others have written, I am grateful and lucky that I know where my loved ones are today and that they are safe.

Monday, January 11, 2010

Holiday Gift Monday: Bed post pillows

This Christmas I decided to try something new with gift-giving. I asked each girl to think about a gift they would like to give their other sister. I didn't say it had to be handmade - rather I let them dream and we back filled with an idea that could be managed at home, with materials on hand. I was amazed with how quickly my mind adapted to putting an idea into action and am even more amazed with how important these gifts are to the girls.

Here are the simple gifts that the twins gave each other. One said, "I think my sister would like Rudolph," and the other said, "I think my sister would like a unicorn." I worked with each girl separately and quickly found images that could be used as templates. They each sat with me while I cut out the shapes from cheap poly felt. Then that was about it for their attention span and I let them go to play while I finished up.

I thought about framing the felt cut-outs, but wanted something more interactive. And the bed post/door knob pillow idea was born. I sewed the cut-outs to a piece of white linen (9-inch square), sewed two squares into a pillow, threw in some stuffing - just enough to make them poofy - and placed a ribbon in the top seam for hanging. The back is embroidered with their name and the date. The girls have taken to hanging them on their bed posts and the door knobs to their closets. But I also like them hung up on the wall. Wouldn't a whole series of these look great on the wall? You could do an entire theme - automobiles, flowers, whatever - and hang them in a row or group. I think they would look great. Art that is kid-friendly, homemade, interactive and beautiful.

Up next is the gift the twins chose for their little sister...


Friday, January 8, 2010

Shapes - my choice

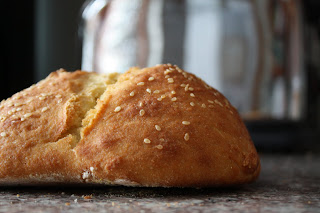
For Friday we were encouraged to come up with our own shape. I went with a dome.


The loaf of semolina bread was made with a recipe from the oft-celebrated book Artisan Bread in Five Minutes a Day. I chose this image especially to encourage Melissa to give bread baking a try. Really, if I can do it anybody can! The other two domes are from a chair that I thrifted a couple years ago. I re-covered the seats a pair of them sit in our dining room, at the ready for dinner guests.

Thursday, January 7, 2010

Holiday Gift: Landscape


This was the big gift for our girls this holiday season - a play landscape with some horses. They watched many a toy catalogue arrive at the house during December and set themselves to picking out toys to tell Santa about. One of the things they got really excited about was a set of horses with a stable.

DH and I decided that with his skills in the workshop we could come up with something just as nice - and probably more adaptive to other play interests - here at home. However, time ran short as the basement renovations took top priority. So rather than an entire stable set-up we came up with this landscape idea; we can always add a stable later.

The horses and paddock are from playmobil. The grass is a piece of felt from my stash, the sand is from the barrel at the corner (our city places these out in the winter to help with the slippery driving conditions), the water is acrylic paint and the rocks I snatched from their growing collection. DH used a router to cut out small recesses for the felt, paint and sand. The large piece of plywood was cut with a jigsaw. Assembly took place during the late afternoon of the 24th and all was dry by midnight when we set out the gifts from Santa. Whew. While I was busy in the kitchen DH and his sister worked on the project. This year my only role was to gather supplies, they did all the work. The piece is relatively lightweight and can be moved all over the house. It's great for tabletop play. I've already watched as it changed over from a paddock to a savannah - giraffes, baboons, lions and tigers have all had a drink at the cool waters edge.

Shapes - organic

Two posts this day. First up is my contribution for shape week and second is a post on my holiday gift projects. For the rest of the holiday projects/gifts I plan to post one each Monday for the next few weeks.


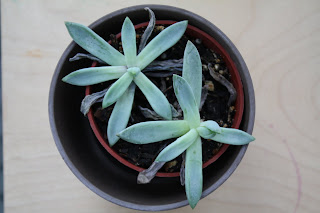
I didn't go with a food item for today (I've saved that one for tomorrow). Instead I went with a plant/flower theme. I really like the way the leaves in each photo point in all directions. To me the shapes are centered yet energetic all at the same time.

Wednesday, January 6, 2010

Shapes - triangle and rectangle

I lost a day with this project yesterday, but here are two photos to catch me up. The first is my triangle photo. This was surprisingly difficult for me. There just aren't that many three-sided shapes, objects or forms in our house. I never knew that about our space before this project. This is a detail from a wall hanging in our front hallway.


Next up is rectangles/squares. There are lots, and lots, and lots of these in our space. We have an older home (c. 1912) that has been meticulously maintained and all the original woodwork is still in place. This is a detail of the fireplace and mantle.


Tomorrow is an organic shape and I have a feeling that I will be posting something that has to do with food.

Monday, January 4, 2010

Shapes and Fonts


My friend Lily is hosting a shape week. Here's my contribution.

My friend Melissa recently had a slew of posts about fonts. I can totally relate to her interest. I snapped the following photos on a walk I took with my youngest in late fall.

Enjoy!


Saturday, January 2, 2010

Holiday Gifts: Allis Chalmers and other superheroes

Earlier this year my mom made superhero capes for my three girls. They were an instant hit and when my nieces and nephews saw them they loved them too. It was only natural to make them a set for the holidays.

My SIL's family are farmers and the first cape, for their son, is in honor of their first tractor which was an Allis Chalmers. The second flower-power cape and the last unicorn cape completely capture all that is magical, whimsical and girly about being a 4 y.o. girl. [To clarify for any new readers, if it seems like there are a lot of little girls in my life it's true, there are. My SIL and I each had twin girls within 2 mos. of each other, I also have a 2 y.o. girl and another 9 mo. old niece.]

I borrowed my mom's template and took fabric ideas from her as well. Originally we worked from ideas seen at local toy stores. The three motifs for my capes were free on-line stencils that I printed and used as templates.

My nieces received a set of 18-inch horses this year, and rather than using their capes for themselves on Christmas morning they immediately draped the capes over the horses as show blankets. They actually fit the horses perfectly and look pretty realistic from afar.


Lastly, here's a photo of my youngest wearing the butterfly cape (from my Mom) earlier this year.

Friday, January 1, 2010

Hello 2010

Last night while DH was livin' it up in Milwaukee with some old friends, I quietly welcomed the new year by tucking three tired kids in bed and finishing up two knitting projects. Feeney, Bailey's very handsome second cousin, kept me company (smile). What's New Year's without a little libation, right?

The second-to-last FO's of 2009 were the Noro striped socks. I am in love with these socks. There's not much more to say. They fit great, I love that they aren't matchy-matchy, and they are warm. I like that they are dark and vibrant at the same time. The only negative is that they require hand washing so I have to keep a good eye on these to make sure they don't wind up in the regular laundry.


Then I put finishing touches on the felted poinsettia wreath. I finally placed it on the wall with just 45 minutes to spare in 2009. There are still some wires that need attending, but I am officially done with this project. I have a few friends that will be happy to see this out of my basket and on my wall as it has been an unwelcome companion at recent craft night get-togethers. I really like the finished wreath, but it was way more tedious than I first expected. Well, in actuality, the project is just as tedious as when I purchased it but I purchased it over two years ago. That is a long time ago considering how much I've learned about knitting since then. I would probably think twice about a project like this if I saw it for the first time today. This project required making 96 petals, 8 stems and at least 120 french knots. I even had to bust out needle nose pliers. In the end I am happy I knit it. While I cursed each and every small step towards completion it is a reminder of what drew me to knitting in the first place; what I call the aesthetic of knitting (color and form)*.


With these two projects out of the way I am close to what will be my first FO's of 2010: the Mystery Socks and the vest.

I'm not sure what's next after that. For 2010 DH and I have agreed to work from our respective stashes as much as possible (exclusively?). It's our resolution to each other and I think it's a good one. We decided to make it a competition of sorts and the rules will emerge over time. Although I've got some stiff competition - he's getting quite handy with his hand planes - I'm looking forward to it. My knitting baskets are overflowing with skeins of yarn and I'm excited to find the perfect project for each one of them.

Oh, and lest you think I spent the remainder of this day relaxing and playing with my kids, let me assure you that I/we didn't. Not more than two hours after I posted my youngest fell while carrying her play chair; a fall that required three stitches to her bottom lip. We spent most of that day in the emergency room.

* - I am not an art or textiles scholar, nor do I have any training in knitting. What I know I've learned from others, the internet and library books. I don't really know what the aesthetic of knitting is, or what it might actually mean. And I certainly don't want to offend any knitters out there with my use of these terms. But, in my brief time as a knitter, I've found a basic distinction that seems to define, but not divide, knitters. Some are drawn to the way that knitted objects look. Others are drawn to the way that knitted objects feel. I find myself in the first group, and often give secondary consideration to the way that various fibers feel. This is what I mean by the aesthetic of knitting. I rather fancy the way knitting looks.