Showing posts with label problems. Show all posts

Thursday, April 10, 2014

FO: Birch Bark (CF Recipe)


**Sweater was first complete in December 2013, subsequent modifications complete in January 2014, but these photos were taken this month.**

My first CustomFit pattern!  I am so excited about this knit.  It's not perfect, it's not ideal, but it turned out just as I had hoped.

CustomFit is a new piece of proprietary knitting software developed by Amy Herzog and colleagues.  It is amazing in every way - and I thought she couldn't get more amazing after meeting her in-person last year for a "Knit to Flatter" course.


From that initial Knit to Flatter course I learned so much about knitting sweaters and fit.  As a result of that class I knit up enrobed and vignette

And then...

I learned about CustomFit.  This software allows you to pick a general sweater pattern (pull-over, cardigan, etc.), enter your own measurements, and enter in a custom gauge swatch.  The software will generate a pattern suited just for you and your specifications.  It is incredible.

My first sweater using CF was Birch Bark (an Amy Herzog pattern).  It turned out great, but a bit on the short side.  It's hard to know if this is a result of mis-measuring on my part, or the general pattern as I've seen other similar comments about this same sweater.

After stewing about the length for a bit I decided to add more.  I cut off the hem, picked up stitches in the round and knit down to add about 1.5 inches and a new hem.  That process wasn't without error and you can see an irregularity in the cables on the panel, but it's not terribly noticeable.  In the photo below you an see where the hem ends, and the new stitches, knit in the round, begin.


Now the length is perfect, but the sleeves are a bit short in proportion.  Learn as you go...learn as you go.

I won't go back and monkey with the sleeves on this sweater, but I have learned something about proportion - especially when looking back at photos of the sweater in its pre-modified state.  I really liked where the sleeves hit in relation to the hem and that relationship isn't the same after I added length to the body.


The yarn for this sweater came from a local mill - Blackberry Ridge in Mount Horeb, WI.  It is a natural gray, worsted weight (100% wool) that is getting softer and softer with each washing.
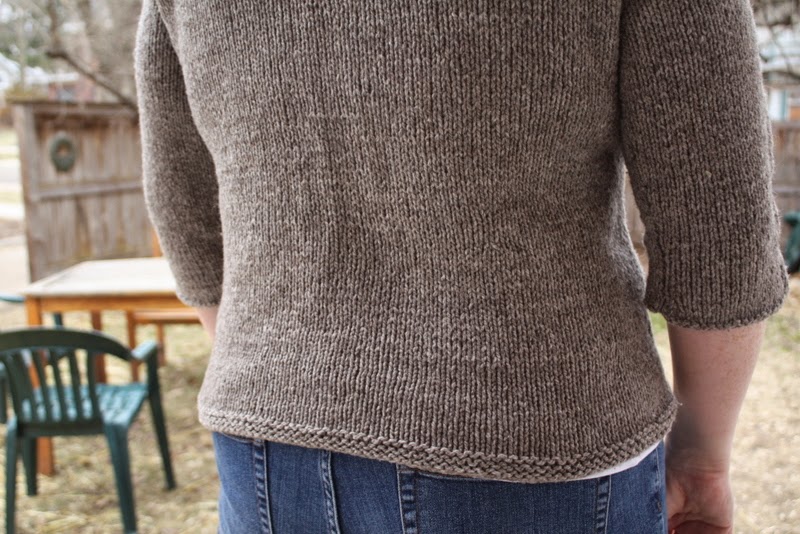

It is a great sweater for these transitional months that WI is so popular for.  A tank top underneath for warmer sunny days and a long sleeve tee for the chillier days.

And for comparison sake, here is a photo of the sweater pre-modification:


Friday, January 30, 2009

Yoga mat vs. Jazzercize mat

Here's the third item from the pre-Christmas flurry. I made it for my Mom for Christmas. It is a carrying bag for her exercise mat (she goes to a class 3x/week). I was so excited to give it to her. Then the harsh reality of handmade holidays set in...silly me thought there was one kind of generic yoga/exercise/jazzercize mat. I had a one-size fits all theory. I was wrong. The bag, which I sized according to my own yoga mat, is too small for her larger-size jazzercize mat. Darn.

The inspriation came from the yoga mat pattern in Pretty Little Patchwork, however I deviated from the actual pattern quite a bit: there isn't any patchwork to be found on this bag and there isn't a zipper either. I decided to go with a tie on the top instead. It was fun to take the basic dimensions from the book, and then really puzzle through my own design and construction methods. I learned how to do botton holes, and sew in piping too, so the project was a bonus for the learning-to-sew factor alone. I will happily adopt this bag back.

Maybe when I start the re-make I'll give the zipper a try. I can't imagine that rolling and slipping a mat any larger then this one into a tube-shaped bag would be easy to do. It reminds me of being at overnight camp with my polyester sleeping bag - those really slippery ones that wouldn't stay rolled up in their elastic ties and would then spill onto the parking lot, or into a muddy puddle.

Tuesday, August 5, 2008

Oilcloth

I feel sort of funny typing the words "oil" and "cloth" together in the same sentence, and the same word. But consider me converted, I love this stuff! I purchased two yards of it the other week at the local fabric shop and have fell in love with it. I can't wait to sew up a little coin purse with it! But, first things first. I purchased it to make some mats for the newly recovered dining room chairs. But, that is as far as I have gotten. I am not sure exactly how to do this. I have cut out two pieces, slightly larger than your standard placemat, which cover the seat nicely, but they slide off the chairs all the time and don't really stay in place. So, here is where all of you come in - what can I do to make them stay on the chairs, but still let's them be removable (to take outside or put on the floor for crafts, etc.)? I haven't really cut into the fabric very much, so there is plenty of extra cloth to work with, but maybe it is just as simple as attaching an elastic band? Your thoughts?


Also, isn't that print just the coolest? I can't wait for the day when the girls realize there are skulls and skeletons riding bikes amongst the flowers.

Saturday, April 26, 2008

(First of...) 3 great bags


Here is the first of three great bags from the pattern 3 Great Bags by Ellie Grisham. The pattern and fabric were an impulse purchase last weekend when I was feeling ansy and cooped up. I was able to get out for a mere 50 mintues - and managed to add another project to my list. However, this one has benefits - namely Mother's Day gift potential! (Mom, if you're reading this, the cat's out of the...well, you know.)

I fell in love with the green batik; reminicent of the budding trees of spring. It is tempered by the flame orange. A color we usually see in fall but is also a great contrast to the green.

This bag was also a great way to test out the sewing machine some more. Dan purchased it for me when we moved into our new home last August and I have been learning about it ever since. I have noticed a frustruating tendency for the machine to skip, or rather, bunch up stiches on the underside of what I am sewing. It doesn't seem to matter what fabric I'm using, the tension of the stitches or anything. I am clueless as to why it happens with such frequency. Maybe something about how the bobbin is wound? This is something that I will have to look into before I venture on to quilting the two quilt tops that I have stashed in the corner. Incidentially, I didn't have any problems with this issue when I was sewing the girls' fishing game.